|
|
|
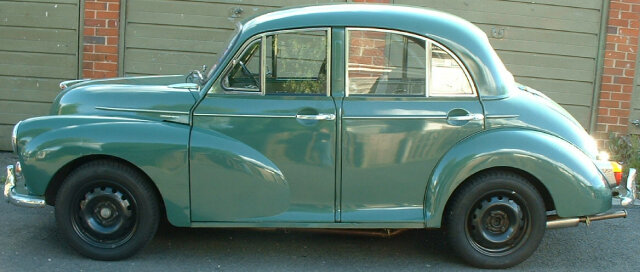
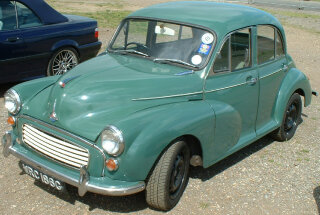
Type: 1000 Saloon (4 door)
Year: 1969 (G)
Colour: Almond Green |
|
|
|
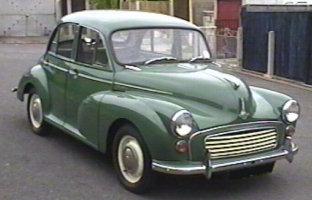
Type: 1000 Saloon (4 door)
Year: 1969 (G)
Colour: Almond Green |
|
September 2001 |
July 2004 |
|
|
|
|
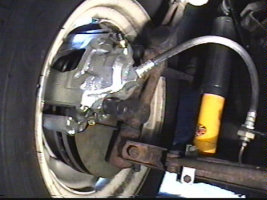
Front Brakes: Ford Sierra vented discs remote bulkhead reservoir
|
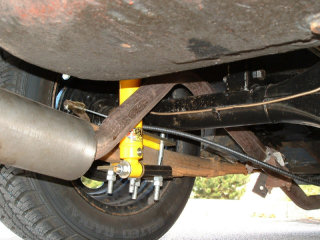
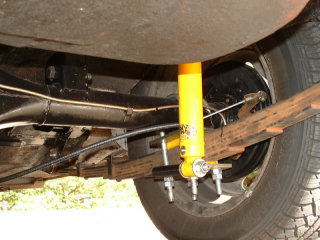
Suspension: Spax front adjustable shocks 100% uprated torsion bars Polyurethane bushes (all round) |
|
|
|
|
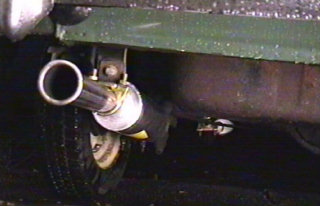
Stainless steel twin box exhaust system |
Stainless steel LCB manifold |
 |
|
|
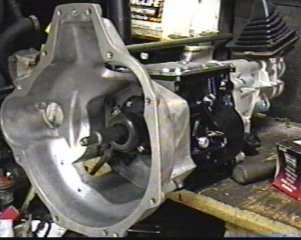
Hydraulic Clutch Conversion |
Sierra 5 speed gearbox Custom Propshaft & Bell-housing |
|
|
 |
|
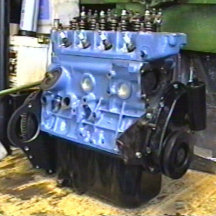
MED 1380 Road Competition Engine with Kent 276 cam MED Road Competition Head
(Click on picture for more info) |
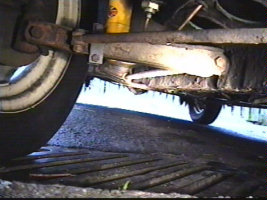
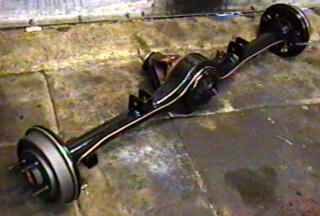
Escort MK II Rear Axle 4.4:1 Diff RS2000 Halfshafts 8" Drums |
| Rear adjustable telescopic shocks with turret mounts welded through floor |
 |
 |
|
|
|
 |
 |
|
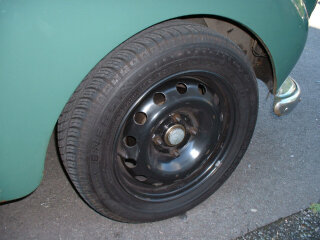
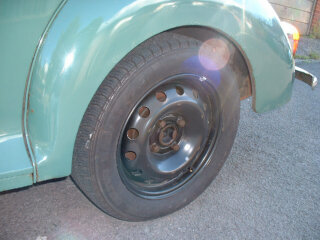
Peugeot 14" steel front wheels with 175/65 Tyres |
Peugeot 14" steel rear wheels with 185/60 Tyres |
 |
|
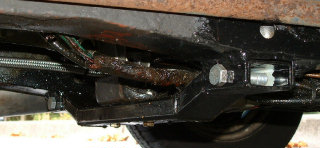
| Radius arms to locate axle
and prevent tramp |
Box-section Gearbox crossmember |
Everything else - Original!
For pictures taken over the years of work done, click here.
Progress!
When I first had the car, I noticed a few odd things - the wheels wobbled when approaching 50mph and you had to give three weeks notice in writing for the brakes to stop the car. Another thing that I found was that even if you go over speed bumps extremely slowly the car almost bottoms out at the front indicating very sloppy front suspension.
The first operation was to get the front wheels balanced! Next was to uprate the front brakes with the Owen Burton Sierra based vented disc kit which required a little filing here and there to get everything to fit ok and also to drill out the brake backplate fixing holes on the stub axle assembly. A small seal also had to be removed from the master cylinder which was leaky and so was replaced with a new one.
The torsion bar on the nearside came off ok but the offside one would not budge, so as it was being replaced, it was cut through (in the middle) and the ends removed with the aid of a blowtorch and a hammer, also the master cylinder bolts would not budge and were rounded slightly so the heads were ground off and new ones were used.
After reassembly, brake bleeding, and playing around with the ride height (to get the car level!) the car was roadworthy again.
The difference in roadholding is phenomenal. The front suspension feels more like a mini than a minor and does not bottom out when going over speed ramps. Because there is a lot less bounce and suspension travel, the car does not move around as much on it's suspension and so is a lot more stable when cornering and going over uneven ground. The only problem was that after going over a bump the car would still bounce a little, which is annoying on long trips, so the next job was the fitment of the SPAX adjustable front dampers!
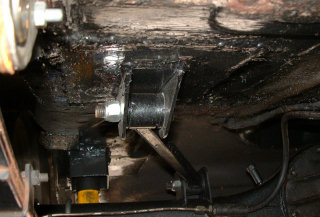
The fitment of the lower bracket was OK, as it is just a bolt on job, but the upper bracket did not line up with the diagram as supplied by Owen Burton. If the diagram was followed to the letter, then the shocker would be diagonal and would not fit on it's mounts! The solution was to make sure that the shocker was vertical and then to line up the horizontal placement with the diagram. This worked fine on the offside, but the reinforcing plate that goes inside the inner wing fouled the wiper motor bracket and so had to be reduced in size slightly at the top by about 4mm.
In order to be able to fit various gauges (Tacho, Temp, etc.) I converted the car from positive to negative earth, which involved the following:
1. Disconnect battery & turn it around (making sure that the terminals don't foul any brackets or bodywork).
2. Disconnect the battery terminals from the wires and swap them over (as they are different sizes for + and -).
3. Connect the earth (negative!).
4. Swap the two coil terminals over.
5. Disconnect the two wires to the dynamo.
6. Connect a piece of wire from the small terminal of the dynamo to the positive of the battery and hold it on for 5-10 seconds (I did 8).
7. Re-connect both dynamo terminals.
8. Re-connect the battery positive. (after disconnecting the negative first so that you don't short out the battery to the bodywork with a spanner).
9. Start Engine!
If the ignition light goes out everything went OK, if not, repeat step 5 onwards.
By using the driver's side glove box as a template, a flat piece of 3mm aluminum was made with holes in for the various gauges, this was then painted the same colour as the car and the gauges were fitted and wired / plummed in. The gauges that were fitted were:
Temperature Gauge: Source: Mini 1000
Oil Pressure Gauge: Source: Mini 1000
Volt meter: Source: Jag (XJ6 / XJS - I think - I can't really remember)
Vacuum Gauge: Source: New - VDO
Tachometer: Source Jag (XJ6 / XJS) - Original numbers removed & new ones letrasetted on in the right place for a four cylinder, which means that the redline on the gauge now reads at 7500 RPM!!!
Clock: Source: Princess or early Cortina - I think - I can't really remember
Ammeter: Source Unknown
An after market 3-spoke steering wheel for a mini was fitted (same boss) but a tube was welded on to the wheel to allow the centre horn press to be retained, this seems to work quite well and does not make the car twitchy at all, but makes driving the car a lot less tiring.
Fitment of the stainless steel exhaust system was generally OK, the pipes fitted together well and it fit the contour of the underside of the car well. The problem was with the LCB manifold, this was offered up to the head, but it fouled the tappet chest cover breather canister quite badly, so this had to be re-shaped(!) to allow clearance, this course of action is definitely NOT recommended but as the car will only have this engine for about a week or so and it is not used daily at the moment it is excusable! The LCB manifold exit was also too close to the body where it leaves the engine bay, so a small amount had to be removed from the access hole so that the manifold would not foul the body when the engine is running.
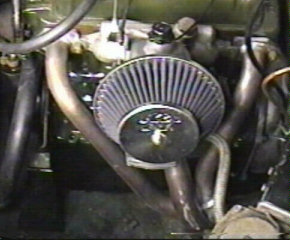
A HS4 was fitted temporarily to allow the car to be used, as I do not have a single inlet manifold for a HS2. A water heated inlet manifold from a mini was used together with a K&N filter. Obviously the choke and accelerator cable needed to be changed for longer items, as the actuators are on the opposite side of the carb.
The power from the engine has increased noticeably and the torque is much better, although the induction roar is VERY loud at 3000 - 5000 RPM. The throttle response is poor as it takes about a second or so after planting the accelerator before any appreciable acceleration occurs, but I just put this down to using engine oil in the dashpot (I seem to remember this problem occurring during the mini days!) this can be cured by using proper S.U. dashpot oil (much less viscose). I won't bother changing the oil with this carb but I will for the HIF44.
The engine ancillaries were fitted to the 1380 engine, consisting of the following:
Water pump (from the old 1293 mini engine - only done 3000 miles).
Alternator + wiring (2nd hand from metro).
Distributor (Lucas 45D4 with Aldon Ignitor from 1293 mini engine, but with new rotor arm, cap & leads).
Oil Filter (Champion D102).
Fan belt (Maestro type - both Mini & Metro types were too small).
Radiator top & bottom hoses.
Oil pressure relief valve (new plunger & spring but old cap & washer from 1300 Maestro).
Oil pressure pipe adaptor (from early Princess).
After this had been performed, the new roller type clutch release bearing was attached to the original Minor release arm and it was bolted into the pivot bracket inside the bell housing. The clutch assembly was attached to the flywheel and the bell housing was attached to the gearbox and the two were offered up to each other to check the clearance of the release bearing to the diaphragm. This was found to be MILES out and had absolutely no chance of operating the clutch. Hmmm.......
After careful consideration it was decided to make a new bracket which was longer, to bring the thrust bearing into contact with the diaphragm. This was done (with a lot of awkward measuring) and seemed to be the correct length to allow normal the operation of the clutch. This new bracket was then bolted into the bell housing and the release arm attached to it with a new bolt & nylock nut. The bell housing was then attached to gearbox & engine and the clearance was checked, which was OK now.
The starter motor was bolted to the engine backplate and the clearance to the flywheel was checked. Firstly some material had to be shaved off the side of the starter motor as it fouled the engine block, when this was done and the starter bolted into place it was found that the starter did not fully disengage from the flywheel, it was only catching by about 1mm, so it was decided to shorten the end of the pinion. After the pinion had been removed from the starter, it was cut all around down to the centre and then the end parts filed off to give the clearance. This was then re-attached to the starter motor and tried once again for disengagement clearance, which this time was OK.
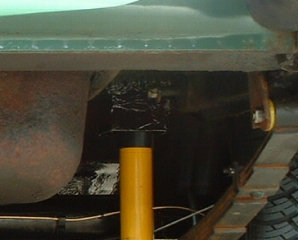
The old minor gearbox crossmember was removed (with the box supported with a jack) and carpets removed together with the steel floor plate that covers the gearbox. A hydraulic clutch conversion was opted for in order to easily operate the diaphragm type clutch, so the new master cylinder was attached to the mounting bracket supplied for the job and this in turn was bolted between the new cross member (for the Sierra box) and the car, with the top mounting for the bracket being bolted to the body using one of the old gearbox crossmember holes. The reservoir for the brake master cylinder was moved from the bulkhead to an aluminium plate attached to the offside inner wing and the new reservoir for the clutch master cylinder was attached next to it. The fluid feed pipe was run alongside the brake master cylinder feed pipe and was attached into the top of the clutch master cylinder.
When driving the car previously, it was found that the brake pedal moved when the clutch pedal was depressed, this was attributed to worn pedal shaft bushes or a worn pedal shaft (or both!), so this was removed and examined, and both the bushes and the shaft were very badly worn, so new bushes were installed (after soaking in oil) and a new pedal shaft was welded to the clutch pedal. When the bushes were drifted in and the pedal shaft was inserted it was very tight and did not fit in the inner bush, this was due to the mounting holes not being in perfect alignment, so they were aligned by hand until they fit, but the shaft was still very tight. This problem was cured by using some very fine emery cloth on the pedal shaft until an acceptable level of movement was achieved, this was then bolted into place with a new nylock nut replacing the old castellated nut & split pin. The clutch master cylinder was then attached to the pedal shaft.
The new engine & gearbox was placed alongside the car and the clutch slave cylinder was attached to it. This enabled the adjustment of the clutch prior to the fitment of the engine & box into the car. The copper pipe was attached between the master cylinder (on the car) and the slave cylinder (next to the car). The old minor clutch actuating bar was cut down (to about 4”) and the end radiused to fit inside the slave cylinder. The ball nut and locknut were reversed and the bar was fitted in between the actuating arm and the slave cylinder and adjusted out. The reservoir was filled up and the clutch was bled and finally adjusted.
The bonnet was removed as well as the front bumper, front grille section & radiator.
The old minor gearbox was drained and the propshaft removed. The gearbox was unbolted from the engine and removal was attempted! – this was impossible even with the ‘box rotated, so the rear engine mounting was removed and the front engine mountings slackened off, this time the ‘box came out OK.
Engine lifting eyes were fabricated and fitted to the engine and the carb, exhaust manifold, wiring, and plumbing were removed, then the engine was hoisted out.
The lifting eyes were transferred from the 1098 to the 1380, the new engine was secured to the ‘box and the clutch slave cylinder was unbolted. The engine and box were then put into position for installation but the rear of the box fouled the body when the front engine mountings were in place, so about 3” were cut out of the floor to allow for the longer Sierra ‘box.
With the Sierra ‘box jacked up in place, the front engine mountings and the rear engine mount (steady) were fitted. The new crossmember was then fitted and drilled for the new Sierra ‘box mounting which was then bolted into place. The gearbox was then filled up to the bottom of the filler hole with Castrol Syntrax.
The new Sierra gearlever was fitted to the box, and it was found that it was impossible to engage 2nd or 4th due to the handbrake fouling the gearlever, so the handbrake lever was removed and shortened by approximately 40mm. This was done by removing the push button, fibre washer, spring and metal plate, cutting around the handbrake tube 40mm from the end and then making a cut at either side of the tube a little further down (same distance from the end as the originals) and knocking the edges of the cuts inward so as to provide a seat for the metal plate. Then the inner rod was shortened by 40mm and the handbrake was re-assembled and fitted back onto the car. The shorter handbrake now allows all gears to be selected when the handbrake is off, but it still fouls 2nd & 4th when the handbrake is pulled on (not that this scenario is ever likely to happen!).
The HIF44 carb was fitted with the BBZ needle and mated to the MG metro alloy inlet manifold which had some material shaved off the mounting areas to allow the correct seating of the exhaust manifold washer which has to lie flat to clamp both the inlet and exhaust manifolds to the head. After this was performed, both inlet and exhaust manifolds were bolted to the head via a standard gasket. The carb heat shield was bent up towards to carb slightly to allow for the centre branch of the exhaust manifold.
As the car was being converted from a dynamo to an alternator, some modifications were necessary. First of all the two large wires from the alternator were terminated with a suitable sized eyelet which was then bolted onto the battery side of the starter solenoid, the thin battery warning wire was connected to the wire that goes from the regulator box to the dash charging warning light after it has been disconnected from the regulator box. The regulator box was rewired at the back so that the internal components were not connected and the box just acted as a junction box. The connections to the dynamo were left on the regulator box but cut from the loom at the engine end (dead wires) and the terminals A and A1 were hardwired together in the back of the regulator box in order to provide the accessories with power.
The rocker cover from the 1098 engine was cleaned up and fitted with new bolt bushes. A new cork rocker gasket was used when it was fitted to the 1380 engine.
The front of the car was fitted into place (with radiator) and the bottom hose connected. When the top hose was attempted to be connected it was found that with the distance piece for the expansion tank in place, in between the thermostat housing and the head, and using a thermostat housing from a mini (different vertical take-off angle) and a 1275 head (different horizontal take off angle) the top hose connection was impossible. The distance piece was removed and the thermostat housing bolted directly onto the head. This eliminated one of the problems but the angle of the take off from the 1275 head was by no means perfect but the hose fit (albeit in a slightly strained ‘S’ shape).
The copper pipe that connects the heater pipe to the take off at the water pump end of the bottom hose was removed from the 1098 engine and connected into place on the 1380. The radiator was then filled with water, and the engine was topped up with Castrol GTX 15W/40 mineral oil.
In order to prime the oil pump, the oil filter was removed and fresh engine oil was dribbled down the side hole where the oil comes out of the ital block and into the filter, as this is directly connected to the oil pump and is higher than the pump, so if this port fills with oil, then the pump should also be filled with oil (in principle anyway and discounting air locks!).
With the spark plugs removed and a watchful eye on the oil pressure gauge, the engine was cranked. It turned quite freely and within about eight seconds or so, the oil pressure gauge flicked up and showed about 75 PSI (approximately).
The spark plugs were fitted and all connections to the engine were doubled checked and tightened. The engine was cranked again and fired within about 5 seconds. The revs were held to about 1500 – 2000 RPM and the engine was given a visual examination while running. There was a metallic tinging sound after about 20 seconds, so the engine was shut down and it was found that the cooling fan was slightly bent and was catching on the top of the radiator, so this was straitened by hand, checked for clearance and the engine re-cranked. This time the engine fired immediately and made no strange noises but sounded quite lumpy. While the engine was running a further visual examination was given and it was found that a tiny jet of engine oil was squirting out of a bolt hole on the left hand side of the block. The engine was shut down and a suitable bolt was found to plug the hole.
The engine was re-started and set to 2000 RPM to break the cam in but it was noticed that the centre branch of the exhaust manifold was starting to glow a very dull red. I had this problem before with my mini, which was a combination of a too lean mixture and too retarded ignition timing, so the engine was shut down, the mixture increased (substantially) and the timing advanced by about 4-6 degrees.
The engine was fired up and sounded a lot smoother, the centre branch of the exhaust manifold was now no hotter (felt from a distance!) than the outer branches. The engine was set to 2000 RPM and run for about 20 minutes to break the cam in. During this time the temperature gauge rose up to normal and then fell slightly (as the thermostat opened) and remained at this value for the rest of the time. The car was then put into reverse and the clutch let up slowly and it moved!! The car was reversed out of the garage and driven back in. The gearbox felt notchy and the thrust bearing squealed as the clutch pedal was pressed gently, but stopped when fully depressed or when not depressed at all.
The thrust bearing is designed to run in contact with the diaphragm at all times, so the linkage was nipped up slightly (not too tight) to enable this. The head was re-torqued to 50 lbs/ft and the rocker clearance set to 15 thou.
When the engine was next re-started the squealing thrust bearing problem had gone, but a water leak was noticed at the bottom of the thermostat housing, which was not surprising since very short bolts were used to secure it after the original ones were discarded as they were too long (meant for the distance piece for the expansion tank also). A new minor thermostat housing together with the appropriate new bolts was fitted which cured the leak and took the stress from the top hose which was still in a slight ‘S’ shape but was a lot more secure and angled (vertically) correctly.
After examination of another HIF44 carb which was lying around, it was found that the breather take-off port is connected directly into the main airflow of the carb, which if left open (as in my case) would cause the mixture to become VERY lean. After learning this, the breather take-off port was plugged and the mixture reset to (roughly) what it was before the previous adjustment. The timing was set back to 8 degrees static at the same time, as this is what was recommended by MED. The engine was fired up and the mixture setting was fine tuned with no glowing manifolds or black smoke!
After about 10 days, an attempt was made to start the engine, which had seized! So a socket was attached to the front crank pulley nut and two ratchet extension bars were fed through the starting handle hole to a ratchet, and very gradually turned; with very little effort, the engine broke free, but the engine was rotated a few times just to make sure that nothing was sticking. When the engine was fired up again, nothing seemed to be wrong, so the engine was fired up and brought up to temperature every two or three days just to make sure!!
In order for the car to be driven on the road, the new fibreglass floor needed to be installed, this was attempted but the connection into the top of the clutch master cylinder from the reservoir in the engine bay stuck up too far with the brake fluid hose connected to it, so the floor would foul it – good design!! – not. The only viable solution to the problem was to make a right angled bend so that the fluid pipe would enter horizontally and not vertically which would give the desired clearance to the floor. A 6mm gas fitting elbow was enlarged slightly internally to fit the external diameter of a piece of steel brake pipe and the spigot fitting was removed from the master cylinder after it was marked for the angle at which the fluid pipe was to be connected to the elbow. The master cylinder spigot was cut down slightly and reduced in diameter to form a tight fit into the 6mm brass elbow. The three pieces (brake pipe, 6mm elbow and master cylinder spigot) were then soldered together to form the right angled connection which was fitted and the fluid pipe secured to it with two fuel type jubilee clips.
The starter motor nose cover was fitted to the bell housing after removing the clutch pedal and drilling 3 holes at peculiar angles. It was held in place with washers and small self-tapping screws. This operation would have been much easier out of the car, but unfortunately it was overlooked when the engine was installed.
The new fibreglass floor was then marked and cut for the pedals, the fixing screw holes and the gearlever hole, and screwed into place after sealing putty was applied around the edges. The carpets were re-fitted (after some slight adjustment for the new gearlever position) and the seats were re-installed.
The bottom rubber lip was cut off from the Sierra gearlever gaiter so that it sits flat under the carpet, and only the outer gaiter was used due to the lack of space between the carpet and fibreglass floor.
It was assumed (foolishly – as it turns out) that the front engine breather would have sufficient breathing if connected to the breather on the rocker cover and the original non-breather oil filler cap was replaced for a breather type, so this was done, which seemed to work.
The front grille was then bolted up properly, and the front bumper and bonnet were re-fitted.
The engine was run for 500 miles (about 3 weeks running) with a 3000 rpm limit and not lugging the engine, after this, the oil & filter was changed. The oil was black and shiny, almost pearlescant – presumably cam lube and tiny particles of white metal from the bearings. The same type of oil was used (Castrol GTX 15W/40 mineral oil) for the next stage of running in.
The engine was run for another 500 miles, still with a 3000 rpm limit but with very slight periodic engine lugging and engine braking to help bed in the piston rings. After this, the oil & filter were changed again. The oil was black but not shiny this time. A different type of oil was used this time (Castrol Magnatec 15W/40) as the running in is completed.
The new self-imposed rev limit was set to 4000 RPM, and wide open throttle was tried for the first time. The acceleration was impressive to say the least, but with the standard rear axle only capable of tolerating about 70 BHP it was decided to stay at under 4000 RPM at wide open throttle and limit the revs to about 4500 at partial throttle.
The engine was run for another 500 miles before 4500 revs was allowed at partial throttle.
The car is quite quick in straight lines – in the dry. If the road is wet then it is lethal around bends, which makes for some amusing driving as the back end comes out for fun! A problem when accelerating is that axle tramp occurs when powering around a bend in the dry or sprinting in the wet, this has to be remembered as the off side leaf spring snapped when I tried to accelerate a bit too quickly from rest in the wet.
After examination of the leaf springs, it was found that the previous owner has fitted a traveller (7 leaf) spring to the near side and a late saloon (5 leaf) spring to the off side (which snapped). This I failed to notice when I bought the car as well as there being no rear bump stops fitted, and the off side lever arm damper having no oil in it or top filler cap on it!! The damper was replaced with a reconditioned one, and as the traveller springs are stronger, the 5 leaf broken spring was replaced with a 7 leaf traveller spring, and two bump stops were fitted.
The front spring hanger on the off side was replaced with a less rusty one, and a crack in the front of the spring hanger bracket was noticed, so this was welded along with the near side one. The whole area and the underside adjacent to the sill section was painted with grey oxide gloss to give it some protection.
A small patch of oil was found under the engine where the car is normally parked, so the engine was checked for leaks, and a small leak has developed at the bottom of the front timing chain cover, this could have been caused by over pressurisation caused by the breather link pipe and piston blow-by during the running in period. So, it was decided to remove the link pipe and install two K&N crankcase breathers, one on the front timing cover breather and one on the rocker cover. This has (hopefully!) removed any pressurisation problem, but the oil leak still needs sorting out – although it is only slight it is annoying.
To be continued...........